Building LinkedIn-Based CRM With Fuzen
Leveraging LinkedIn for business growth is more important than ever. LinkedIn isn’t just a vast network for professionals; it’s also a goldmine for generating high-quality leads. That’s why we’ve created an easy-to-use platform to help you build a custom LinkedIn CRM without any hassle.
Whether you're a seasoned marketer or just getting started, this LinkedIn CRM setup will transform how you manage leads. Let’s dive in and see how Fuzen can help you build it effortlessly.
Why a LinkedIn CRM is important?
LinkedIn isn’t just a platform for job seekers; it’s a goldmine for business development. With over 900 million users worldwide, LinkedIn provides a vast pool of potential leads and connections. But managing these leads manually can be overwhelming. That’s where a LinkedIn CRM comes into play.
A LinkedIn CRM helps you:
- Import Leads: Automatically pull leads from LinkedIn into your CRM.
- Automate Engagements: Set up workflows to engage with leads without manual intervention.
- Nurture Leads: Create and manage a series of messages to build relationships over time.
Integrating LinkedIn with your CRM streamlines your lead management process, saving you time and increasing your efficiency.
How to build LinkedIn-based CRM with Fuzen?
Step 1: Setting Up the Data Structure
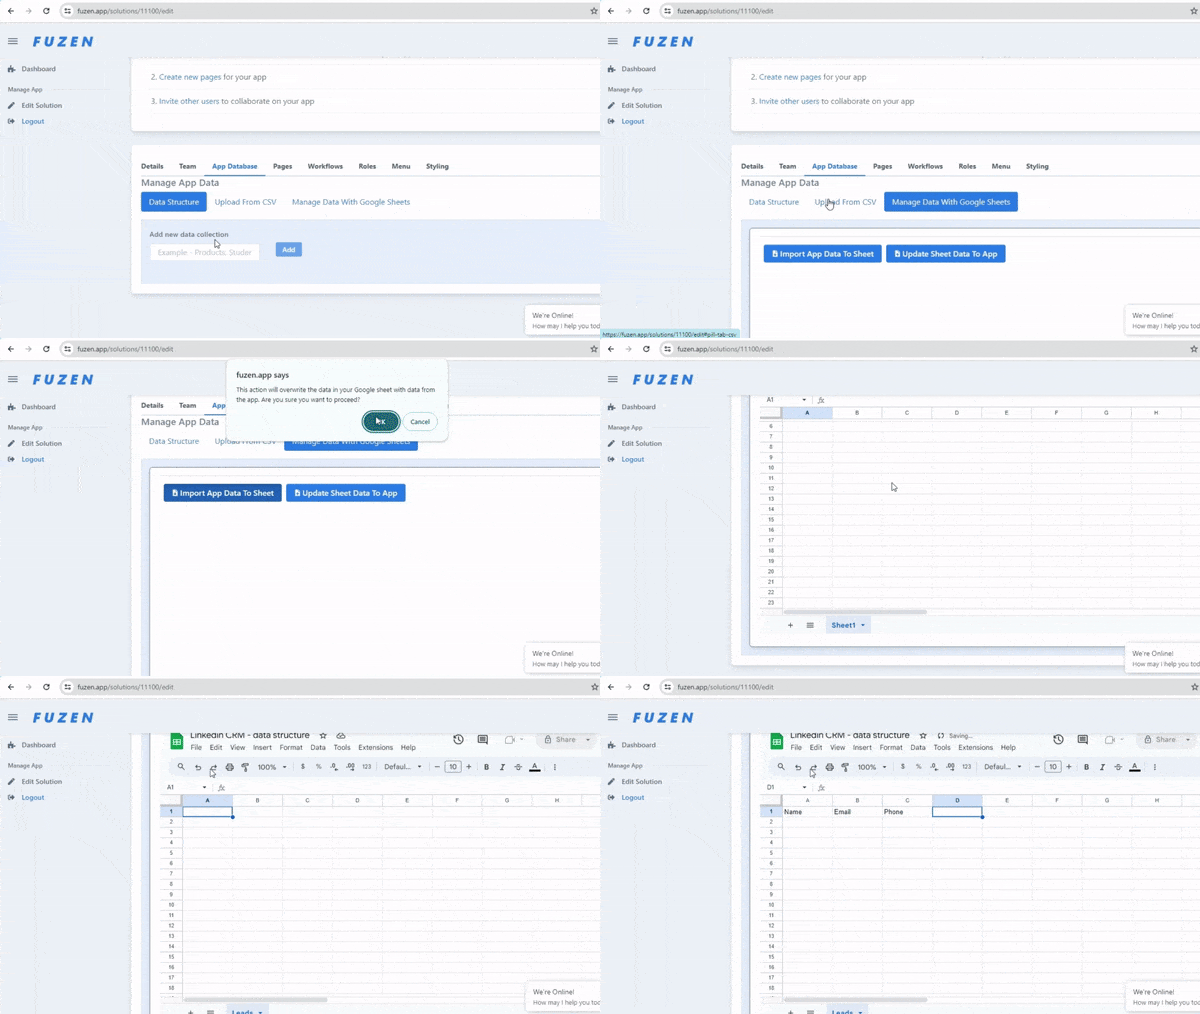
To start, we need to set up the data structure in Fuzen. We’ll use a simple spreadsheet integration for this.
Creating the App and Integrating Google Sheets
- Go to the database section in Fuzen.
- Find the Google Sheets option.
- Click "Import app data to sheet" to create an empty spreadsheet.
This spreadsheet will represent different data collections in our database. Here’s how to set it up
Defining Data Collections

- Leads Collection: Create columns for name, email, phone, company name, industry, LinkedIn bio, status, owner, and remarks.
- Message Sequences Collection: Set up a collection for managing message sequences.
- Message Templates Collection: Include columns for message text, serial number, delay (days after the previous message), and sequence ID.
Step 2: Integrating LinkedIn with a Chrome Extension
Now that we have our data structure set up, let’s integrate LinkedIn using a Chrome extension to seamlessly import leads from LinkedIn.
We have developed this extension for our own internal use. However, if you are interested in building this CRM, we will be glad to share it with you. Just email us at [email protected].
Let’s see how to add this extension.
Installing the Chrome Extension
- To import leads from LinkedIn, we’ll use a custom Chrome extension. Here’s how to install it:
- Open Chrome and click on the extensions button.
- Enable developer mode.
- Click "Load unpacked" and select the extension folder from your laptop.
Using the Extension
Once installed, you’ll see a 'Save Lead' button on LinkedIn profiles. This button allows you to save profiles as leads directly into your CRM. It’s super convenient!
Step 3: Building the User Interface
With our data structure and LinkedIn integration in place, let’s move on to designing the user interface. Our app will have four pages.
1. Setting Up the Dashboard
The dashboard is your central hub for viewing all your saved leads. It's already present by default, but we need to customize it to display our LinkedIn leads effectively.

Here’s how to set it up
- Add a Header: Start by adding a clear, descriptive header to your dashboard.
- Add a Table Block: Next, add a table block to your dashboard. This will be used to display the lead data in an organized manner.
- Filter Lead Data: Configure the table to filter and display the relevant lead data. Choose which columns to show based on the information you've collected, such as name, email, company name, industry, LinkedIn bio, and status.
- Link to Lead Details Page: Make each row in the table interactive by linking them to the individual lead details page. This allows users to click on a lead and view more detailed information.
- Save and Preview: Save the changes to your dashboard. Then, preview the live page to ensure everything is functioning as expected.
Clicking on any lead should navigate you to the lead details page where you can view and manage specific lead information.
2. Setting Up the Lead Details Page
The Lead Details page is initially blank, but we can enhance it by adding relevant elements to manage and view detailed lead information.

Here's how to structure it
- Add a Card and Header: Start by adding a card element to the page. This card will serve as the main container for the lead information. Then give the page a clear and descriptive header to indicate its purpose, such as "Lead Details."
- Split the Card Body: Divide the card body into two columns to neatly organize the information.
- Add Basic Lead Details: In the left column, include fields to display the basic lead details such as name, email, LinkedIn bio, company name, and industry.
- Add an Update Form: In the right column, add a form that allows you to update the lead status, specify the next action, and schedule when that action should be taken. This form should include fields like "Lead Status," "Next Action," and "Action Date."
3. Setting Up the Message Sequences Page
The Message Sequences page is where you'll manage and organize your messaging sequences.

Here's how to design and structure this page effectively
- Add a Form for Messaging Sequences: Create a form that allows you to add new messaging sequences. This form should include fields for the title and description of the sequence. Ensure the form is easy to use and understand, with clear labels for each field.
- Add a Table to List Sequences: Add a table to display the list of messaging sequences. Each row in the table should represent a different sequence. Make each row interactive by linking them to the "Manage Sequence" page. This way, users can click on a sequence to view and manage its details.
- Save and Preview: Save the changes to your Message Sequences page. Go to the live view to ensure everything is set up correctly. Add your first messaging sequence using the form you created.
- Navigate to the Manage Sequence Page: After adding a sequence, click on it to navigate to the Manage Sequence page. This will allow you to add and edit the messages within the sequence.
4. Setting Up the Manage Sequence Page
The Manage Sequence page will allow you to add and manage message templates within a specific messaging sequence.

Here's how to set it up
- Add a Title: Start by adding a clear and descriptive title to the page, such as "Manage Sequence."
- Add a Form for Message Templates: Create a form that allows you to add message templates to the current messaging sequence. This form should include the following fields
- Message Text: The content of the message.
- Serial Number: The order in which the messages will be sent, starting from 1.
- Delay: The number of days between the previous message and this one.
- Add a Hidden Field for Sequence ID: Include a hidden field in the form to store the message sequence ID. This ensures that each message template is linked to the correct messaging sequence.

Conclusion
Congrats! You've just built a LinkedIn-integrated CRM using Fuzen. By following this guide, you can now easily import and manage leads, automate engagements, and nurture your leads effectively. This CRM will save you time and boost your productivity. Keep exploring and customizing your CRM to fit your needs. Stay tuned for more tips from Fuzen.

